Combining text with an image creates all sorts of creative problems. It can be difficult to unify the text and image. It can also be difficult to get the text to stand out from image. When editing with Photoshop, you can use
layer effects, such as drop shadows, embossing and stroke outlines. You can also use the pre-defined effects available in
layer styles.
Sometimes it can be fun to make your own customized fills for text. Here are three examples:
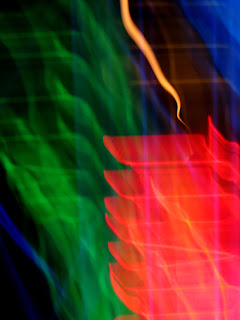 |
| Original image used in examples 1 and 2 |
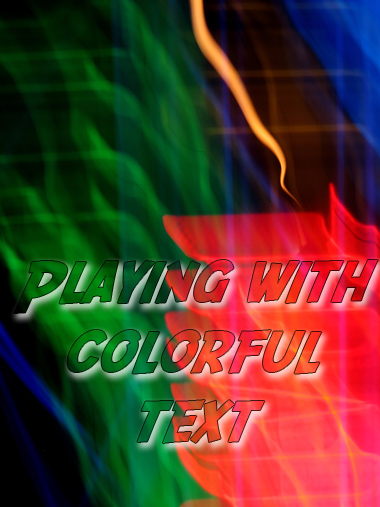 |
Example 1: Create text embedded in an image
using a clipping mask with a duplicate layer |
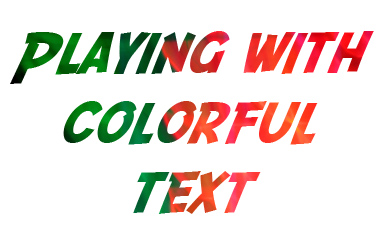 |
Example 2: Create colorful text using a clipping mask
of your original image and a solid colored
background layer |
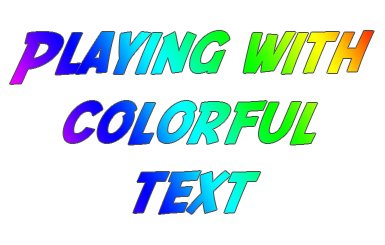 |
Example 3: Create colorful text using
a clipping mask with a gradient layer |
Example 1: Text made from your background image
- Open your image in Photoshop
- Use the text tool to type your text onto your image.
Choose a color that is easy to preview. It doesn't matter what color you choose, as the color will be replaced in this exercise. Bold text often works best.
- Add a simple layer effect, such as a drop shadow or stroke outline.
You can find layer effects options under Layer > Layer Style
- In your layers panel, make your background layer your active layer.
- Duplicate your background layer.
- In your layers panel, drag your text layer between the background copy and background layer.
- Make the topmost layer (background copy) your active layer.
- Click Layer > Create Clipping Mask.
- Save your work.
- You may adjust the placement of your text by making your text layer active and moving it with your move tool.
- You can change your font and font size by highlighting the text with your text tool.
- You can change your layer effects by double clicking on effects in the layers panel.
- Save your work.
Example 2: Colorful text using an image
- Follow steps #1 - 9 in Example 1
- Make your background layer your active layer in the layers panel.
- Make the colors in your toolbox return to default by clicking D on your keyboard.
- Select the entire image by clicking Select > All (Ctrl+A or Cmd+A)
- Replace your background with white by cutting.
Edit > Cut
- You may adjust the placement of your text by making your text layer active and moving it with your move tool.
- You can change your font and font size by highlighting the text with your text tool.
- You can change your layer effects by double clicking on effects in the layers panel.
- Save your work.
Example 3: Colorful text using a gradient layer
- Create a new image in Photoshop
File > New
Make sure your background color is white before you click OK
- Use the text tool to type your text onto your white canvas.
Choose a color that is easy to preview. It doesn't matter what color you choose, as the color will be replaced in this exercise. Bold text often works best.
- Create a gradient layer. Click Layer > New Fill Layer > Gradient
In the gradient fill dialogue box, choose a gradient with a pleasant color scheme. Don't worry that you can not see your text. I recommend setting your angle to something other than 90, so you will see variation in your text colors. This can be adjusted later. When you have chosen a grdient color scheme and angle you like, click OK.
- Click Layer > Create Clipping Mask.
- Save your work.
- You may adjust the placement of your text by making your text layer active and moving it with your move tool.
- You can change your font and font size by highlighting the text with your text tool.
- You can change your layer effects by double clicking on effects in the layers panel.
- Save your work.
