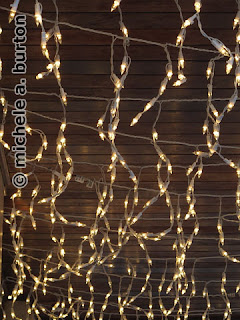
Creating a Festive Holiday Light Photo
using Photoshop and sandwiched image layers
 |
| Finished Image |
In order to create this out of focus image, I took my camera out of auto-focus and manually set the focus distance to infinity, even though I was shooting something less than 2 feet away.
 |
Image #2
Canon G11
exposure: 1/5 sec. at f 8 ISO 200
custom white balance
subject distance 9 feet
focusing distance 9 feet
|
The image is of multiple strands of white Christmas lights, photographed while panning with the camera set on continuous shooting. See image below for the strings of Christmas lights photographed without panning.
 |
| Same lights as above no panning |
 |
Image #3
Residential Christmas lights strung on a bush
Canon G11
exposure: 1/100 sec. at f 4.5 ISO 400
daylight white balance
subject distance 1.5 feet
focusing distance infinity
|
By focusing at infinity, the individual lights show up as
soft circles instead of crisp lights.
How the composite image was made -
- Photograph the 3 original images and download to computer
- Make any adjustments to color and contrast; save adjusted images as flattened filesI shot my images in RAW and made minor adjustments in Canon's Digital Photo Professional software before transferring the images to Photoshop.
(jpeg, tiff or psd) - Open your images in Photoshop.If you are using Adobe Bridge, there is a shortcut for creating a layered document.
- Highlight the images you wish to work with in Adobe Bridge;
- Click Tools> Photoshop > Load Files into Photoshop Layers
- This shortcut will create one new document with all 3 of your images layered on the same canvas. Only the topmost image will be visible.
- If you did not use "Load Files into Photoshop Layers" method described above, layer your files using the following method.
- Make your second image your active image
- Select > All
- Edit > Copy
- Make your base image active. (the one you want on the bottom)
- Edit > Paste
- Save your work as "holiday lights 01" or similar name in a psd or or tiff format
- Make your third image your active image
- Select > All
- Edit > Copy
- Make your base image active.
- Edit > Paste
- Save your work
- Only the topmost image will be visible.
Make the topmost layer active
In the layers panel, click on the word "Normal" as shown in the photo below. Change your blending from "Normal" to "Lighten". The lighten blending mode compares each pixel of the upper layer with the layer below and displays the lighter of the two pixels in one spot.
for more info on blending modes and how they work, see Adobe's help file for Photoshop CS5
Make the middle layer active
In the layers panel, change the blending mode to lighten.
Save your work
If you wish, you can alter the effects of any layer by changing its opacity. For the example image, I changed Image #2 to 50% opacity to lessen the intensity of the vertical streaks. To accomplish this, I did the following.
- Made Image #2 the active layer
- Went to layers panel and moved the opacity slider to 50%.
If you wish to post your image online or send it to a photofinisher for printing, be sure to make a copy of the image; flatten the copy and save it as a jpeg.
- Image > Duplicate (File > Duplicate in Photoshop Elements)
- Layer > Flatten
- File > Save As file type jpg
Finished Image

